Verify the machine, DNS and resource budget
Connect over SSH with the provider’s address and SSH port. Run the checks below before installing anything. Continue only on Ubuntu 24.04 with x86_64 architecture and sufficient free capacity. Dedicated hardware normally reports none for virtualization; an OpenVZ/LXC VPS needs provider-confirmed Docker support.
Facepunch’s Rust baseline is 12 GB free RAM / 15 GB free disk. A 16 GB Rust budget is a useful starting target cited by MineStrator, not a universal minimum. Leave resources for the host services and backup copies; do not assign all physical RAM to the node’s game servers.
cat /etc/os-release
uname -m
systemd-detect-virt
free -m
df -h /Expected resultUbuntu 24.04, x86_64 and a documented capacity budget. Both DNS names resolve to the dedicated machine before certificate creation.
Install PHP 8.3, MariaDB, Redis and Nginx
Enter a root shell with sudo -i. On this fresh Ubuntu 24.04 target, PHP 8.3 and MariaDB are available from Ubuntu’s repositories; no Ubuntu 22.04 PHP PPA is needed. Install the required extensions and the editing/network tools used below.
The walkthrough uses Panel 1.15.1 and Wings 1.13.3, the stable releases checked on 5 October 2026. Panel 1.15.1’s declared PHP requirement accepts 8.3. Record versions when installing and review release notes before any later upgrade.
sudo -iapt update
apt install -y php8.3 php8.3-common php8.3-cli php8.3-gd php8.3-mysql php8.3-mbstring php8.3-bcmath php8.3-xml php8.3-fpm php8.3-curl php8.3-zip mariadb-server redis-server nginx curl ca-certificates tar unzip git nano cron dnsutils certbotsystemctl enable --now mariadb redis-server php8.3-fpm nginx cron
php -v
redis-cli ping
dig +short panel.example.com A
dig +short node.example.com AExpected resultPHP reports 8.3, Redis answers PONG and both DNS results show the correct public IPv4.
Install Composer 2 and download the Panel
Download Composer’s installer into /tmp, verify its current SHA-384 from Composer’s official signature endpoint, and only then run it. The checksum is fetched rather than hard-coded because the installer changes.
Create the empty Panel directory and download the versioned release below. Check its SHA-256 before unpacking. These commands are for a first install, not for overwriting an existing Panel.
Important: If a checksum fails, stop. Do not execute the installer or unpack the archive. Keep .env private; it will contain database, mail and encryption secrets.
cd /tmp
curl -fsSLo composer-setup.php https://getcomposer.org/installer
COMPOSER_INSTALLER_SHA384=$(curl -fsSL https://composer.github.io/installer.sig)
printf '%s composer-setup.php\n' "$COMPOSER_INSTALLER_SHA384" | sha384sum -c -php /tmp/composer-setup.php --2 --install-dir=/usr/local/bin --filename=composer
composer --versionmkdir -p /var/www/pterodactyl
cd /var/www/pterodactyl
curl -fL -o panel.tar.gz https://github.com/pterodactyl/panel/releases/download/v1.15.1/panel.tar.gz
printf '%s panel.tar.gz\n' '62c88c035b3e0f3c3ddd06bc3ef12249d087af0e765f49878b6327a066ed860b' | sha256sum -c -cd /var/www/pterodactyl
tar -xzf panel.tar.gz
chmod -R 755 storage bootstrap/cache
cp .env.example .env
COMPOSER_ALLOW_SUPERUSER=1 composer install --no-dev --optimize-autoloaderExpected resultChecksum checks return OK, Composer reports 2.x and the Panel PHP dependencies install successfully.
Create the Panel database and a private database password
Open MariaDB as root. In the SQL block, replace <UNIQUE_DATABASE_PASSWORD> with a newly generated alphanumeric password from your password manager before execution. This database is for the Panel; the Rust server does not need a separate MySQL database for this tutorial.
The database user is deliberately scoped to panel and 127.0.0.1. Keep MariaDB/Redis private to this machine; do not open their ports to the Internet.
mariadbCREATE DATABASE panel;
CREATE USER 'pterodactyl'@'127.0.0.1' IDENTIFIED BY '<UNIQUE_DATABASE_PASSWORD>';
GRANT ALL PRIVILEGES ON panel.* TO 'pterodactyl'@'127.0.0.1';
EXIT;Expected resultThe panel database and its local user exist without SQL errors.
Set the environment and create your Panel administrator
Run the commands below separately from /var/www/pterodactyl. The environment commands ask for the values listed here.
Store .env, especially APP_KEY, in encrypted off-machine storage. Never regenerate APP_KEY for an existing installation: losing it makes encrypted Panel data unrecoverable.
- Generate the application key once, for this empty first install only.
- Environment setup: use your
https://panel.example.comURL and a valid timezone. - Cache, session and queue: choose Redis at
127.0.0.1, port6379. - Database: host
127.0.0.1, port3306, databasepanel, userpterodactyland the password created in the previous step. - Mail: enter your actual SMTP service settings.
- Initialize the tables and eggs, then create your own user. Answer yes to the administrator question.
- Apply the ownership and
.envpermissions shown in the final command block.
cd /var/www/pterodactyl
php artisan key:generate --forcecd /var/www/pterodactyl
php artisan p:environment:setupcd /var/www/pterodactyl
php artisan p:environment:databasecd /var/www/pterodactyl
php artisan p:environment:mailcd /var/www/pterodactyl
php artisan migrate --seed --force
php artisan p:user:make
chown -R www-data:www-data /var/www/pterodactyl
chmod 600 /var/www/pterodactyl/.envExpected resultMigrations complete and your administrator exists; the database and APP_KEY backup are recorded privately.
If it does not work
- Database connection error? Check the 127.0.0.1 user, database/password and MariaDB service. Do not rerun key:generate as a repair step.
Enable the scheduler and queue worker
Open root’s crontab and add the scheduler line below once. Save it. Then create /etc/systemd/system/pteroq.service with the supplied contents and enable the worker. In nano, save with Ctrl+O, Enter, then leave with Ctrl+X.
crontab -e* * * * * /usr/bin/php /var/www/pterodactyl/artisan schedule:run >> /dev/null 2>&1nano /etc/systemd/system/pteroq.service[Unit]
Description=Pterodactyl queue worker
After=redis-server.service
[Service]
User=www-data
Group=www-data
Restart=always
ExecStart=/usr/bin/php /var/www/pterodactyl/artisan queue:work --queue=high,standard,low --sleep=3 --tries=3
RestartSec=5
[Install]
WantedBy=multi-user.targetsystemctl daemon-reload
systemctl enable --now pteroq
systemctl is-active pteroq redis-server
crontab -lExpected resultpteroq and Redis report active, and the scheduler line appears once.
Serve certificate challenges for both DNS names
In the provider firewall, allow TCP 80 and 443 to this machine; keep your actual SSH port available to your own address. Do not expose database/Redis ports. Create the ACME directory and the temporary Nginx site below, replacing both DNS names.
This is a fresh machine: disable only Nginx’s default enabled site by moving it aside, then enable your new site. This HTTP site serves certificate challenges only, not a login page.
Important: If sites-enabled/default is already absent, skip that move. Never move or replace another existing site; this recipe is for a new dedicated machine.
mkdir -p /var/www/letsencrypt
nano /etc/nginx/sites-available/pterodactyl.confserver {
listen 80;
server_name panel.example.com node.example.com;
location ^~ /.well-known/acme-challenge/ { root /var/www/letsencrypt; }
location / { return 404; }
}mv /etc/nginx/sites-enabled/default /etc/nginx/default-site.disabled
ln -s /etc/nginx/sites-available/pterodactyl.conf /etc/nginx/sites-enabled/pterodactyl.conf
nginx -tsystemctl reload nginxExpected resultnginx -t succeeds; both public DNS names reach this HTTP site.
Issue the TLS certificate and enable HTTPS
Request one certificate covering both real DNS names. Enter a monitored email address when Certbot asks. After success, replace the temporary Nginx file with the HTTPS configuration below; the certificate directory uses the first requested name.
Keep the HTTP challenge location for automatic renewal. This configuration uses PHP 8.3’s socket and the Panel’s public directory, not the repository root.
certbot certonly --webroot -w /var/www/letsencrypt -d panel.example.com -d node.example.comnano /etc/nginx/sites-available/pterodactyl.confserver {
listen 80;
server_name panel.example.com node.example.com;
location ^~ /.well-known/acme-challenge/ { root /var/www/letsencrypt; }
location / { return 301 https://$host$request_uri; }
}
server {
listen 443 ssl http2;
server_name panel.example.com;
root /var/www/pterodactyl/public;
index index.php;
ssl_certificate /etc/letsencrypt/live/panel.example.com/fullchain.pem;
ssl_certificate_key /etc/letsencrypt/live/panel.example.com/privkey.pem;
ssl_protocols TLSv1.2 TLSv1.3;
client_max_body_size 100m;
client_body_timeout 120s;
sendfile off;
add_header X-Content-Type-Options nosniff;
add_header X-Frame-Options DENY;
location / { try_files $uri $uri/ /index.php?$query_string; }
location ~ \.php$ {
include fastcgi_params;
fastcgi_pass unix:/run/php/php8.3-fpm.sock;
fastcgi_param SCRIPT_FILENAME $document_root$fastcgi_script_name;
fastcgi_param HTTP_PROXY "";
fastcgi_param PHP_VALUE "upload_max_filesize=100M \n post_max_size=100M";
fastcgi_read_timeout 300;
}
location ~ /\. { deny all; }
}nginx -tsystemctl reload nginx
systemctl enable --now certbot.timer
certbot renew --dry-runExpected resulthttps://panel.example.com shows the Panel login without a certificate warning, and the renewal dry run succeeds.
If it does not work
- Certificate failure? Check DNS, public TCP 80 and the ACME location. A Panel 502 usually calls for checking php8.3-fpm and the socket path, not changing Rust ports.
Install Docker from its official Ubuntu repository
Use Docker’s signed APT repository on this fresh Ubuntu 24.04 amd64 host. Create the repository file with the contents below, then install the packages. Do not run an unreviewed all-in-one Panel installer.
Docker-published container ports can bypass UFW rules. Use the provider firewall for public filtering and review Docker’s firewall policy before publishing RCON. Do not assume that an UFW deny rule alone protects a container port.
install -m 0755 -d /etc/apt/keyrings
curl -fsSLo /etc/apt/keyrings/docker.asc https://download.docker.com/linux/ubuntu/gpg
chmod a+r /etc/apt/keyrings/docker.asc
nano /etc/apt/sources.list.d/docker.sourcesTypes: deb
URIs: https://download.docker.com/linux/ubuntu
Suites: noble
Components: stable
Architectures: amd64
Signed-By: /etc/apt/keyrings/docker.ascapt update
apt install -y docker-ce docker-ce-cli containerd.io docker-buildx-plugin docker-compose-plugin
systemctl enable --now docker
docker infoExpected resultdocker info returns server details without a daemon-connection error.
Create the node and install Wings
Sign in as your Panel administrator and open the admin area. The node represents this dedicated machine; Wings runs its game containers. API and SFTP ports are service ports, not Rust game ports.
- In Locations, create a location. Open Nodes → Create New and select that location.
- Set the FQDN to your
node.example.comdomain, enable SSL and select no reverse proxy. - Set the Wings API port to 8080 and SFTP to 2022 for this walkthrough.
- Reserve memory and disk for the OS, Panel and backups. Set the node’s limits below the machine’s capacity and over-allocation to
0. - Use
/var/lib/pterodactyl/volumesas the data directory only if that filesystem has enough free space. - Use the command blocks below to download and verify Wings amd64, then install it only after checksum OK.
- Open the node’s Configuration tab. When nano opens
/etc/pterodactyl/config.yml, paste the complete private YAML; preserve its generated URL, UUID and token. - Set
api.ssl.enabledto true andapi.ssl.cert/api.ssl.keyto the certificate paths below, replacing the domain. Protect the file and run the startup check.
Important: Node YAML contains an authentication token. Never paste it into public support chats or screenshots. Do not replace it with a generic example.
cd /tmp
curl -fL -o wings_linux_amd64 https://github.com/pterodactyl/wings/releases/download/v1.13.3/wings_linux_amd64
printf '%s wings_linux_amd64\n' '010d894a895fe4f914e3f1c1e75fb2fda4ebe50cc249e7e456887ea5b422c8fa' | sha256sum -c -install -m 0755 /tmp/wings_linux_amd64 /usr/local/bin/wings
mkdir -p /etc/pterodactyl
nano /etc/pterodactyl/config.yml/etc/letsencrypt/live/panel.example.com/fullchain.pem
/etc/letsencrypt/live/panel.example.com/privkey.pemchmod 600 /etc/pterodactyl/config.yml
wings --debug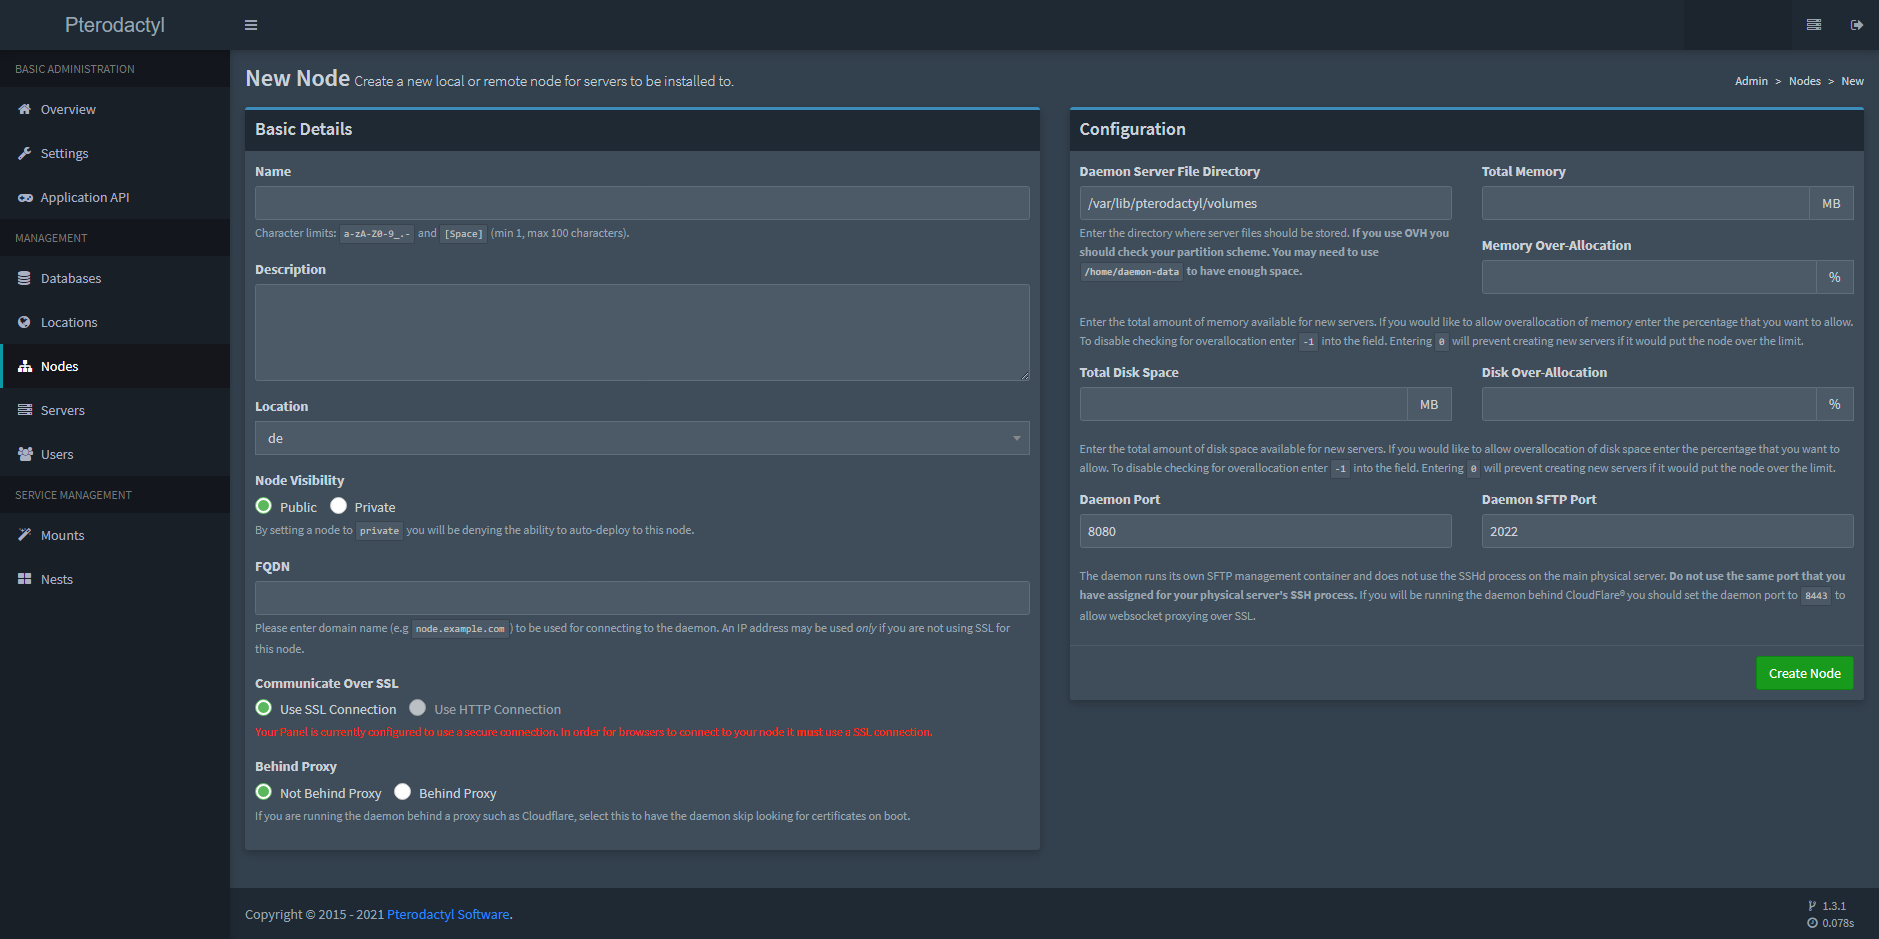
Expected resultWings starts without configuration/TLS errors and can reach your Panel. Stop this debug foreground process with Ctrl+C before enabling its service.
Keep Wings running and reload renewed certificates
Create /etc/systemd/system/wings.service with the unit below and enable it. Allow Wings TCP 8080 to the Panel and browsers that will use the Panel; restrict SFTP TCP 2022 to the intended administrators where practical.
Create the Certbot deploy hook so Nginx and Wings pick up a successfully renewed certificate. Keep the ACME webroot reachable on TCP 80.
nano /etc/systemd/system/wings.service[Unit]
Description=Pterodactyl Wings
After=docker.service
Requires=docker.service
PartOf=docker.service
[Service]
User=root
WorkingDirectory=/etc/pterodactyl
LimitNOFILE=4096
ExecStart=/usr/local/bin/wings
Restart=on-failure
RestartSec=5
[Install]
WantedBy=multi-user.targetsystemctl daemon-reload
systemctl enable --now wings
systemctl is-active wings
mkdir -p /etc/letsencrypt/renewal-hooks/deploy
nano /etc/letsencrypt/renewal-hooks/deploy/pterodactyl#!/bin/sh
/usr/sbin/nginx -t && /usr/bin/systemctl reload nginx
/usr/bin/systemctl try-restart wingschmod 750 /etc/letsencrypt/renewal-hooks/deploy/pterodactyl
systemctl list-timers certbot.timer
journalctl -u wings -n 30 --no-pagerExpected resultThe node shows a healthy connection in Panel, Wings is active and certificate renewal has an enabled timer and deploy hook.
If it does not work
- Node disconnected? Check its FQDN, SSL selection, API port, provider firewall and journalctl output. The browser also needs to reach Wings; do not only test the Panel’s homepage.
Allocate the exact Rust ports before creating the server
Use the read-only checks below to find the machine’s network-interface IP and confirm the example ports are free. The query port 27017 comes from the selected Rust egg.
- Open Admin → Nodes → your node → Allocation and use the real network-interface IP, never
127.0.0.1. - Create four unused port allocations: 28015/UDP game, 27017/UDP query, 28016/TCP RCON and 28082/TCP Rust+.
- When creating the Rust server in the next step, assign all four and select 28015 as primary. Its startup variables must match those allocations.
- At the provider firewall, allow game/query to players and Rust+ if wanted. Review Docker filtering as well.
- Keep RCON closed to the public: the local console bridge does not need public access. If you need external RCON, allow only trusted administrator IPs.
Important: If any example port is occupied, choose another free port and update its allocation, startup variable and firewall rule together. Do not change only one of the three.
ip -4 address
ss -lntup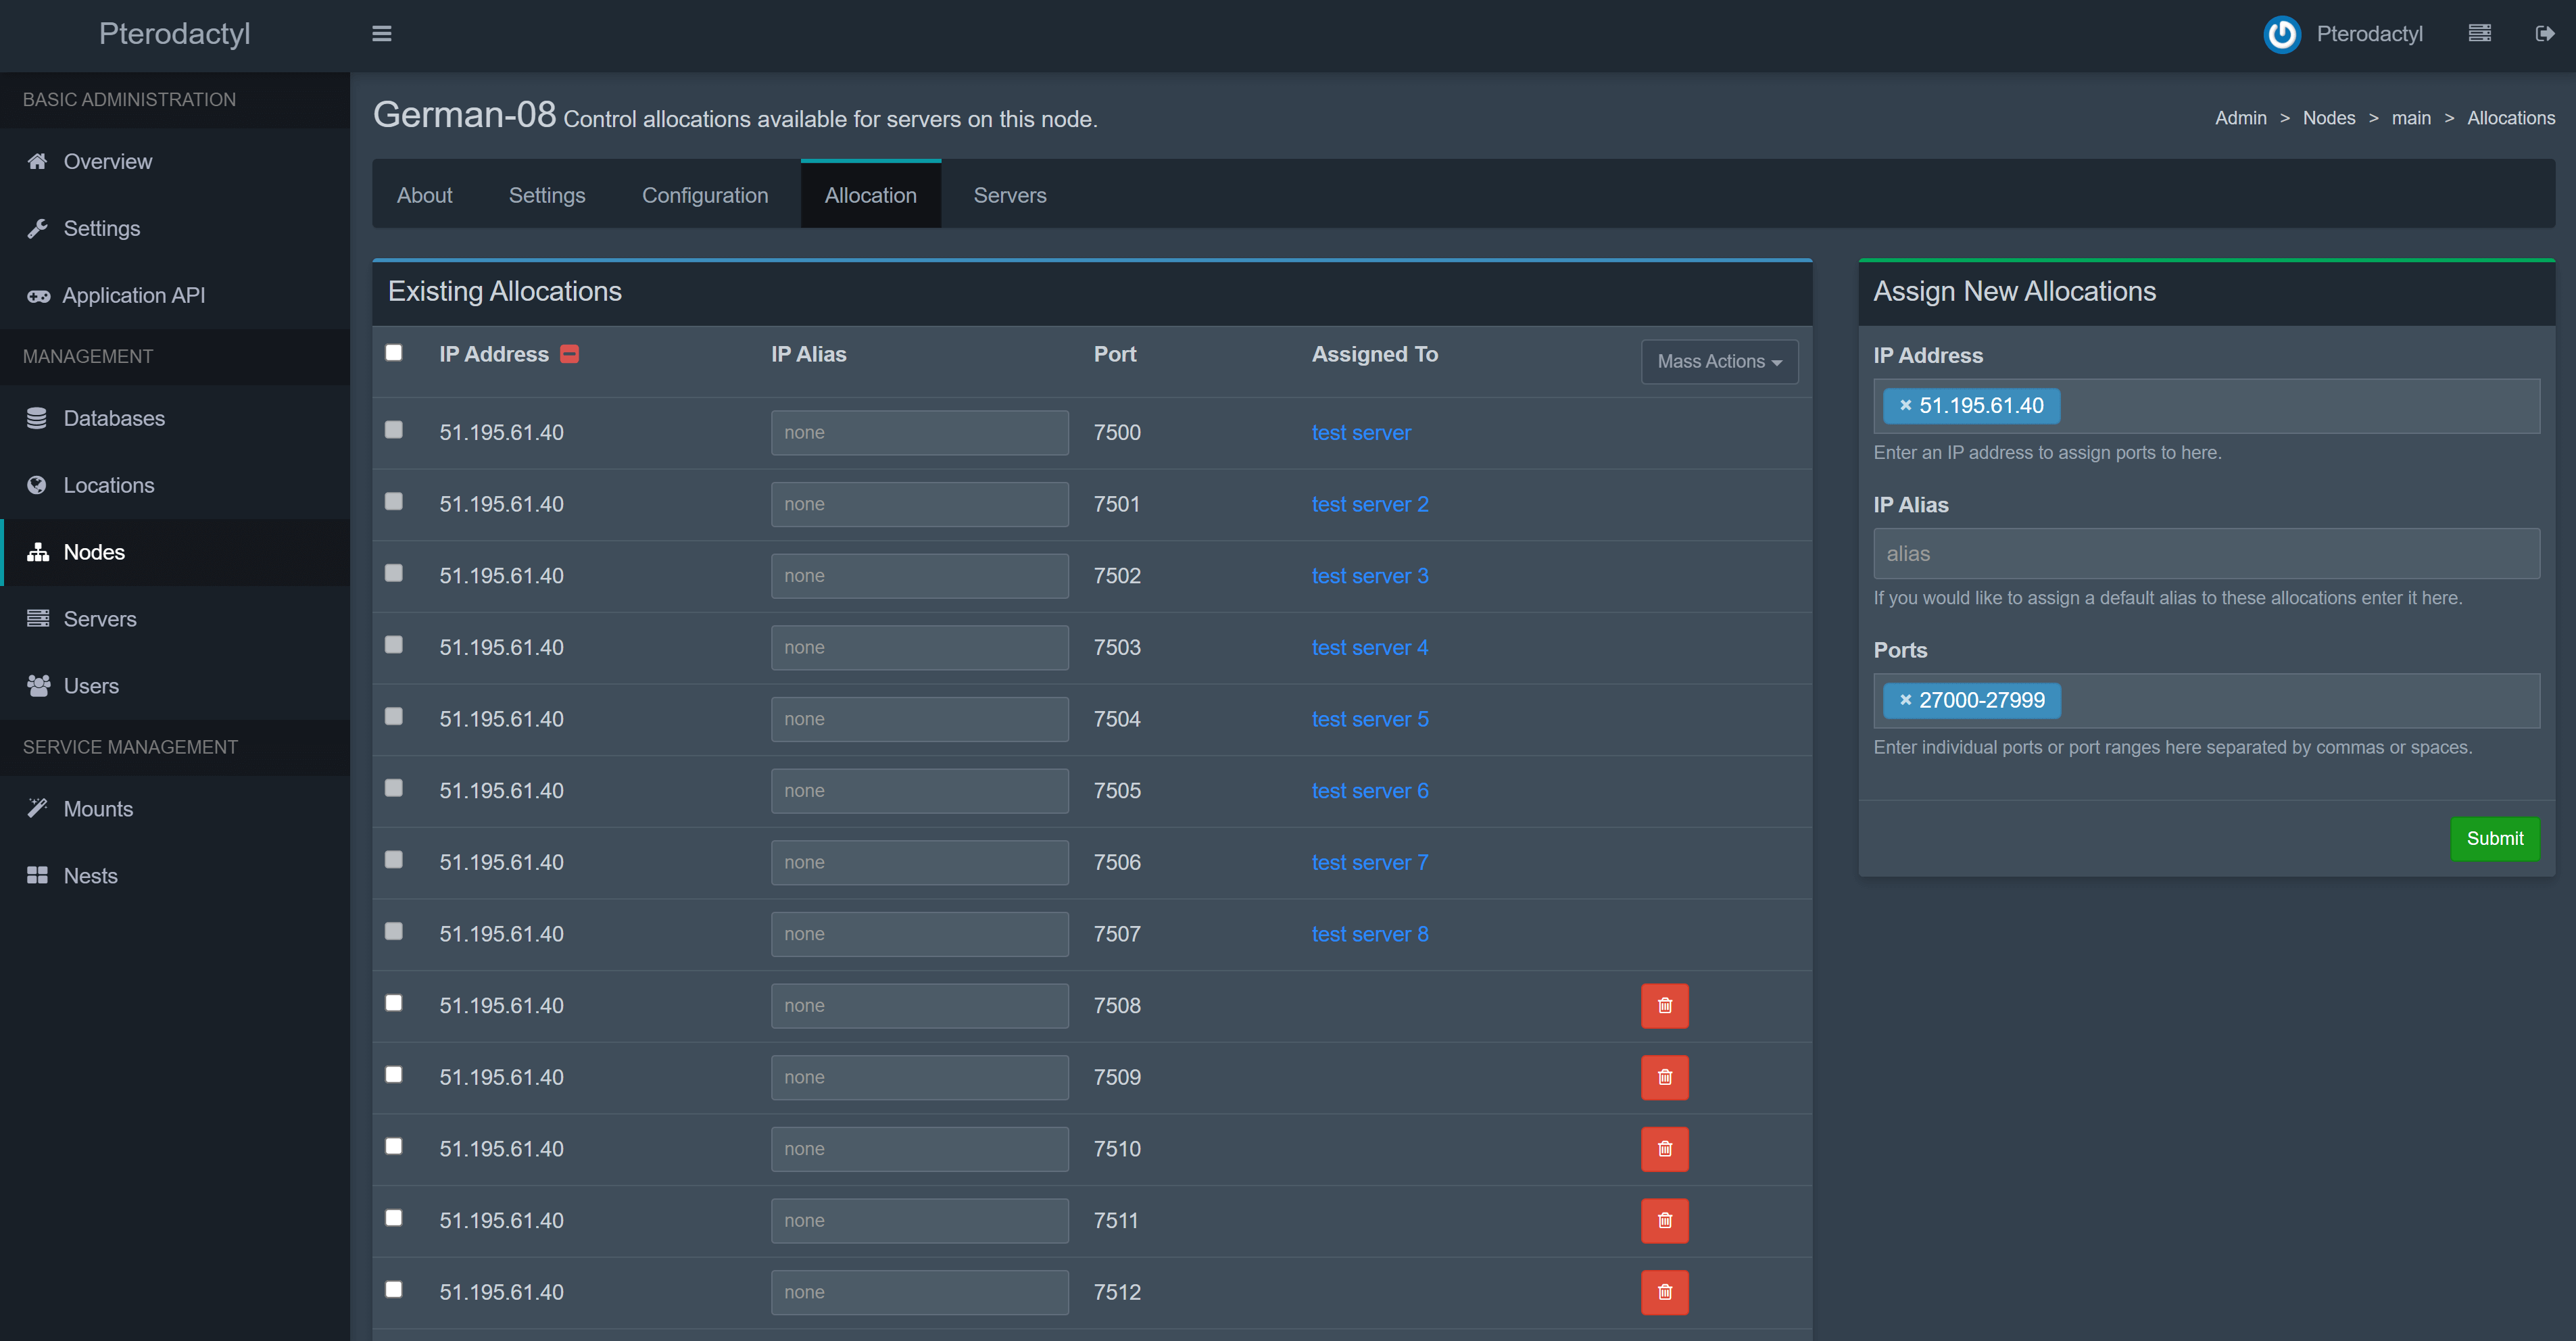
Expected resultThe node has matching, unused allocations and a documented firewall policy; game and query ports differ.
Create the server with the official Rust egg
An egg defines how Pterodactyl installs and starts a game. This walkthrough uses the official Rust egg linked below. A CPU limit of 400% permits up to four core-equivalents; it does not reserve physical cores or guarantee performance.
- In Admin → Nests, find the seeded Rust egg and compare it with the official JSON. If it is missing or lacks
Modding Framework, download that JSON and use Import Egg in a suitable nest. - Open Admin → Servers → Create New, set yourself as owner and uncheck Start Server when Installed. You will start Rust manually after checking its settings.
- Select the node, the primary game allocation and the three extra allocations.
- Select the Rust egg and image
ghcr.io/pterodactyl/games:rust. Leave installation enabled: it downloads Rust Dedicated through SteamCMD. - Allocate at least 12288 MiB of RAM for this example (12 GiB). Do not overcommit the node.
- Allow at least 15360 MiB of disk for Rust files, with extra capacity for world and log growth.
- Set the backup limit to at least
1if using Panel backups. - Before submitting, open Service Variables: set Modding Framework to
vanilla, World Size to3000, World Seed to12345and Max Players to10. Match Query Port, RCON Port and App Port to the allocations above. - Enter a unique RCON Password now: generate 32 random letters and digits and store it privately. This required field cannot be left empty when creating the server.
- Click Create Server and wait for installation to finish. Leave the server stopped for the next check.
Important: Keep the official startup template. Its identity is rust, so the world/config path is server/rust.
Expected resultInstallation completes and Rust remains stopped. The settings show the official image, resource limits and filled service variables.
Check startup settings before the first start
Open Startup and check the values entered during creation against this list. These settings are for a limited connection test; some port variables can only be edited by a Panel administrator.
Keep ports in startup variables: a conflicting server/rust/cfg/server.cfg can override them.
- Modding Framework / FRAMEWORK:
vanilla. Level:Procedural Map. - World Size:
3000. World Seed: a fixed value such as12345. Max Players:10. - Query Port:
27017. RCON Port:28016. App Port:28082. Match the allocations selected above. - RCON Password: check that your private password is present. Keep the unique secret entered during creation; do not replace it with an example from a screenshot.
- Save Interval:
60seconds, the selected egg’s setting. - Leave Custom Map URL and Additional Arguments empty for the first test.
Important: The image can print the expanded startup command, including RCON credentials. Treat the console/logs as private and redact screenshots before sharing them.
Expected resultAll startup ports match the assigned allocations, vanilla is selected and the RCON secret is set without being published.
Start vanilla, connect and assign your native role
Open the server’s Console and click Start. Wait for Server startup complete. The image’s console bridge waits for local WebRCON; Waiting for RCON to come up is not proof that map generation has completed.
In the Rust client’s F1 console, connect with the public IPv4 and primary game port. After joining, use the Panel server console to assign your Steam64 ID as owner and check native access in game. Reconnect only if the client still shows the old role. Do not type the owner command into SSH or SteamCMD.
connect <SERVER_IP>:<GAME_PORT>ownerid <STEAM64_ID> "Server owner"Expected resultYou enter the correct world and have owner access; role changes are saved automatically by current Rust. A separate ordinary client can connect through the game port.
If it does not work
- Connection timeout? Check the actual game port in logs, primary allocation and provider/Docker firewall. Direct play can work even if the query listing is unavailable.
- Panel console keeps waiting for RCON? Compare RCON_PORT/RCON_PASS with the launched process and check startup errors. Do not disable WebRCON: the official image uses it for console commands.
Optional: enable Oxide and install one plugin
Stay vanilla if you do not need plugins. To use Oxide, save the world, stop cleanly and take a downloadable backup first. In Startup, change Modding Framework / FRAMEWORK to oxide, then start normally. The official image updates Rust and overlays the selected framework; do not upload framework DLLs manually.
In the Panel server console, verify oxide.version. Download Vanish.cs from the author’s uMod page and upload it using Files to oxide/plugins. Inspect compilation and oxide.plugins; then edit the generated oxide/config/Vanish.json, preserving all keys. For a manual test, disable automatic vanish and noclip, and do not grant vanish.permanent.
Reload only Vanish, grant vanish.allow to the intended Steam64 ID, and test /vanish on/off in chat with a nearby ordinary player. Uploads/JSON exports do not grant permissions. If using Carbon instead, choose its framework separately and follow its own folders/commands; do not overlay both or assume every plugin is compatible.
oxide.versionoxide.pluginsoxide.reload Vanishoxide.grant user <STEAM64_ID> vanish.allow/vanishExpected resultOxide and Vanish load without errors; only the intended user can toggle the feature. Vanilla remains a valid stopping point for this tutorial.
Back up both Rust and the Panel, then check persistence
For Rust, run server.save, wait for completion and stop cleanly. In the server’s Backups tab, click Create backup, name it, keep excluded files empty for this complete copy and wait for success. Open that backup’s menu → Download and keep a separate copy. Include server/rust and framework plugins/config/data/lang/permission files. Preserve Rust+ companion.id privately when used; it is not a shareable identifier.
For the Panel, keep an encrypted off-machine copy of .env/APP_KEY, the database dump below, /etc/pterodactyl/config.yml, service/web configuration and your recorded versions. Panel backups of a game do not back up the Panel database. The dump command reads a password interactively instead of putting it in the command line.
Restart Rust normally. Check the same world, your native role, direct external connection and query listing; if modded, check framework/plugin versions and permitted/denied behavior. For a deliberate rollback on this server, stop it, open the intended backup’s menu → Restore and read the confirmation. Only select Delete all files before restoring backup if you intend to replace the whole target. Test recovery separately before trusting the backup; a forced Rust wipe may make an old world incompatible.
Before a future Rust restart/update, take a fresh backup and check framework compatibility: the official image updates by default. Update Panel/Wings through their version-specific upgrade procedure, not by repeating this first-install guide or generating a new APP_KEY.
Important: Do not publish the dump, .env, node YAML or full startup logs. Do not delete every .db file as an update or wipe shortcut.
server.saveinstall -m 0700 -d /root/pterodactyl-backups
umask 077
mariadb-dump --single-transaction --no-tablespaces -h 127.0.0.1 -u pterodactyl -p panel > /root/pterodactyl-backups/panel-$(date -u +%Y%m%dT%H%M%SZ).sqlExpected resultThe server survives a normal restart with its world and intended access; Rust and Panel have separate recoverable off-machine backups.