Choose resources and create Rust
Keep 12 GB free for Rust and 15 GB free on SSD/NVMe as Facepunch’s baseline, with room for plugin data and backups. Compare the host’s modded Rust recommendation, not only its advertised slot count.
For the illustrated MineStrator offer, its creation guide recommends 4 dedicated cores / 16 GB. Its modded estimates are 12 GB for 7–25 players, 16 GB for 26–50 and 24 GB+ above that, with map/plugin assumptions. These are MineStrator estimates, not capacity guarantees for every host.
For an existing server, skip creation and keep its current world settings. For a new server:
- Open your hosting offer’s control panel and choose its server creation or installation action. MineBoard calls it Créer un serveur and asks for your MyBox.
- Choose Rust if required, then a location close to your players if the offer provides a region choice.
- Review the summary and confirm installation. In MineBoard, the button is Créer le serveur.
- Wait for installation to finish and open the server’s management page; MineBoard uses Gérer le serveur.
Expected resultYou can manage one Rust server with an adequate resource budget.
Connect in vanilla before adding plugins
For a new server, keep the host’s unmodded Rust installation for the first connection. If a framework selector is present, choose vanilla; MineBoard has it under Paramètres → Framework de modding. Set the name, seed and world size, save, then start and wait for Server startup complete in its console.
From Rust’s F1 console, connect to the public IP and game port shown by your host. Confirm that you enter the expected world. Already modded and working? Keep that configuration and take a backup; do not switch frameworks just to repeat this check.
connect <SERVER_IP>:<GAME_PORT>Expected resultA direct client connection works before you diagnose any plugin.
If it does not work
- If it times out, first check startup and the game address. Installing Oxide does not repair a wrong IP, port or unavailable server.
Back up, then enable Oxide
Use your host’s documented Oxide/uMod activation, not a reinstall action. In MineBoard, choose Paramètres → Framework de modding → oxide; GPORTAL uses Basic Settings → Oxide Mods, while GG Host uses Mod Manager.
- Run
server.savein the hosting panel’s server console. Wait for completion, then stop the server. - Create and download a backup before changing the framework. Without downloadable backups, copy
server/<identity>through file access while Rust is stopped; find the identity inserver.identityor ask support. If plugins are already installed, also preserve the completeoxidefolder and their external data. - Activate Oxide with the control described by your provider. If it is already installed and working, keep it and continue with the checks below. Without a documented activation for your offer, ask support before changing server files.
- Save the settings and restart the server. Wait for startup to finish.
- Run
oxide.versionin the server console, then open the file manager or SFTP access and check foroxide/pluginsandoxide/config. MineBoard’s file tool is WebSFTP.
Important: Change only the framework, not the world. In MineBoard, leave ‘Régénérer le serveur’ unchecked and do not add files to delete. Carbon is a different framework: follow its own installation guide if that is what your offer supports; do not overlay Carbon and Oxide DLLs.
server.saveoxide.version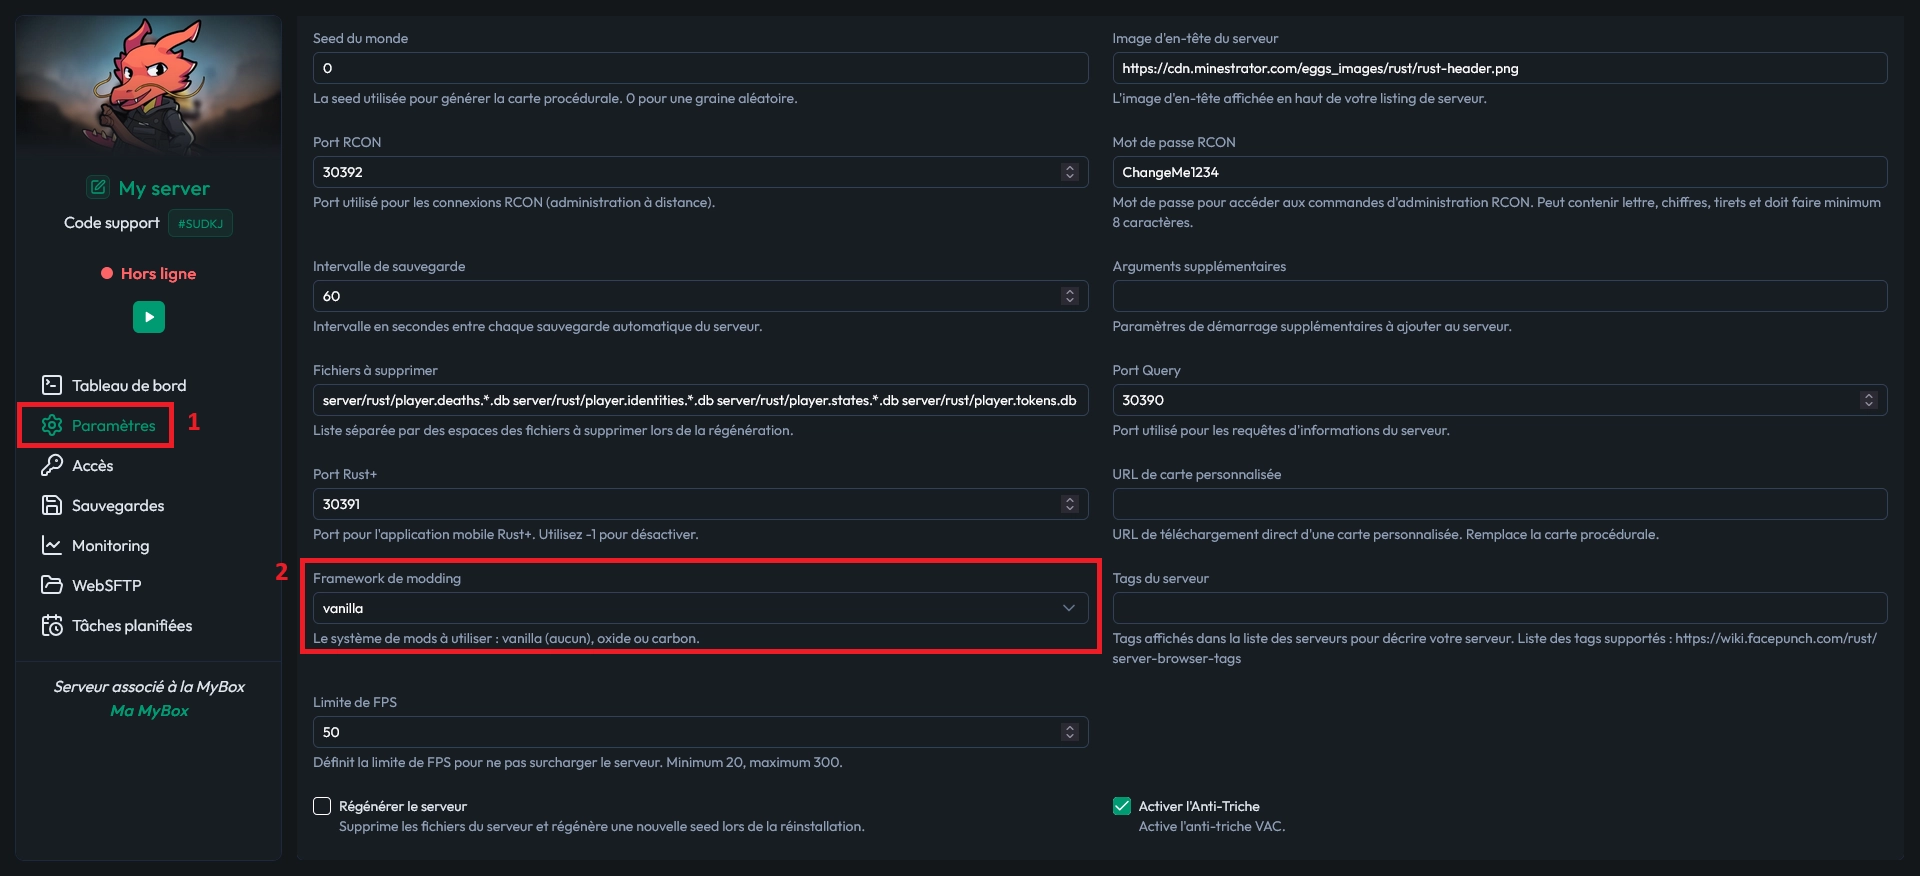
Expected resultoxide.version returns a framework version, and file access exposes oxide/plugins and oxide/config.
If it does not work
- Unknown command or no oxide folder? Recheck the saved framework and restart result. Keep the startup error for host support rather than reinstalling the world.
Install one plugin: Vanish
Oxide normally detects and compiles a new .cs automatically. This walkthrough uses Vanish 2.1.4 and its vanish.allow permission; check the author’s requirements for the version you download.
- Open Whispers88’s Vanish page on uMod and download
Vanish.cs. - Open your host’s file manager or SFTP access, enter
oxide/pluginsand upload the file without renaming it. In MineBoard, use WebSFTP. - Watch the server console for compilation, then run
oxide.pluginsto check the loaded version or failure reason.
oxide.pluginsExpected resultVanish is listed as loaded, and oxide/config/Vanish.json has been generated.
If it does not work
- Compilation failed? Read the first error, confirm the filename/framework and check the author’s compatibility notes. Do not install more plugins while this one is failing.
Edit the generated JSON and reload only Vanish
Use the file manager or SFTP access to download a copy of oxide/config/Vanish.json, then edit that file. For a manual-toggle test, keep both automatic connect/disconnect vanish options false, keep private feedback, and set NoClip on Vanish (runs noclip command) to false. Preserve the exact generated key names and valid JSON.
Alternatively, import that server-generated file into PimpMyRust’s Vanish configurator, edit it and Export the JSON. Upload it back to the same oxide/config/Vanish.json path; the web configurator does not install or deploy anything. Run the reload command below in the server console and inspect the result.
Important: The .cs belongs in oxide/plugins; JSON belongs in oxide/config. Do not paste a partial JSON example over the complete generated file.
oxide.reload VanishExpected resultVanish reloads without a JSON error and retains your selected settings.
If it does not work
- JSON error? Restore your downloaded copy, check commas/quotes and reload again. A successful export alone does not prove that the server accepted the file.
Grant one permission and test both player roles
In your host’s server console, replace <STEAM64_ID> with your test staff member’s ID and grant only vanish.allow. Do not use *, the default group or vanish.permanent for this manual-toggle test.
In that player’s in-game chat, enter /vanish, then enter it again to return visible. Ask an ordinary nearby player to verify the change, then test that the ordinary player cannot use the feature. Native owner access and plugin permissions are separate controls.
oxide.grant user <STEAM64_ID> vanish.allow/vanishExpected resultThe selected user can toggle on and off; an unprivileged player cannot.
If it does not work
- Permission missing? Confirm Vanish loaded and inspect oxide.show user <STEAM64_ID>. For 2.1.4, use vanish.allow even though two generated JSON labels still mention vanish.use.
Remove test access or undo the plugin separately
When the test access is no longer needed, first return visible in game. Then run the revoke command below. This removes the direct grant, not permissions inherited through a group.
To remove Vanish entirely, move Vanish.cs out of oxide/plugins through your host’s file access and check the unload message. Keep its config/data backup. Restoring a full server backup is a different, destructive action: use it only when you intend to replace the complete server state.
oxide.revoke user <STEAM64_ID> vanish.allowExpected resultThe direct test grant is removed; check inherited group access separately if the feature is still available.
Check persistence and protect the modded server
Save and stop cleanly, then create and download a full backup through your host’s backup tool or file access. Preserve the complete world identity plus oxide/plugins, oxide/config, oxide/data, oxide/lang, permission files and any plugin-specific external data. Config JSON alone is not a full backup.
Restart normally, reconnect and check oxide.version, oxide.plugins, the same world and the intended permission behavior. Before future Rust updates, check Oxide/plugin compatibility and keep a restorable backup. After updating, repeat these checks before adding more plugins.
server.saveExpected resultThe world, generated configuration and intended access survive a normal restart; a separate backup exists.